Showing posts with label database. Show all posts

Tuesday, October 6, 2015

Restore database from .BAK frile in Ms. SQL Server

Introduction:

In this post I will show you how to restore a database from a backup file (extension of backup file is .bak). It is the most common way to restore a database though there are other several ways to do so, like through excel, access or csv. But in this section we will discuss with the .BAK files.

Description:
Its a very simple and quick process to restore a database from .BAK file. Lets see what are they..

Step 1:
Open your SQL Management Studio and right click on the Database in Object Explorer. To open Object Explorer go to View and click on the Object Explorer. Now right click on the Database and click on the option Restore Database.


Step 2:
Now select Device radio button and click on the immediate right select button. A new window will open named Select backup Device. Click on the Add button to add the .BAK file. Add the file and click on the OK button.


Step 3:
Now when you came back to the previous window after clicking on the OK button you can see that the database name is already taken by the tool automatically. If you want to change the destination Database name then you can change it otherwise keep it as it is and click on the OK button to proceed.


Step 4:
Now on the right upper corner a green color bar will move with showing percentage. It may take some time to restore the database, as it depends on the size of the database. After finishing a message will be showing with the confirmation.
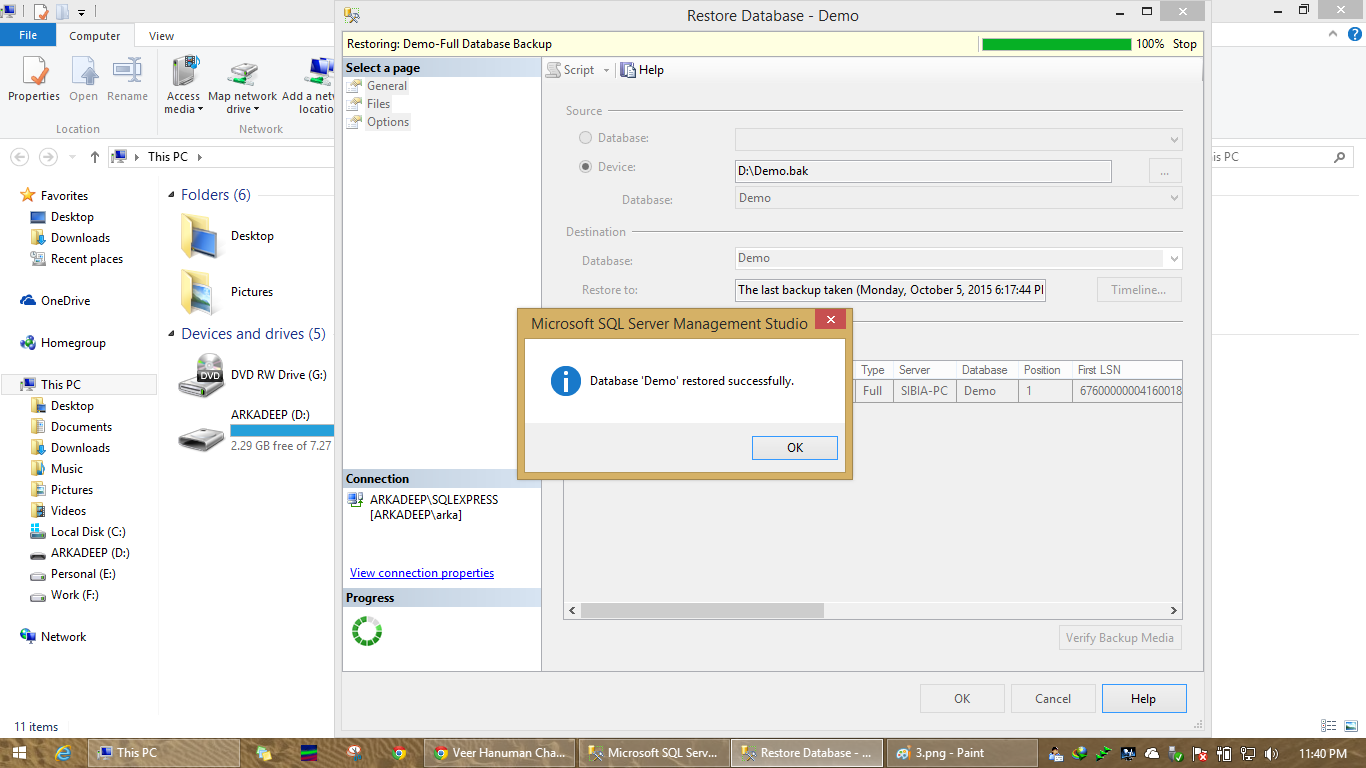

Now go to your database, it will show your restored database in your Database section in Object Explorer. If it is not showing refresh your Database and it will be seen. Now try with yours one. 

Saturday, September 6, 2014

Insert into Database with GridView Edit Update and Delete in ASP.NET using C#

Hi everyone, today I will show you how to insert into a database and update, edit, delete into a GridView using ASP.NET and C# as a request of  Shruti Upari.

So create a new project in your Visual Studio and also open the SQL management Studio to create the database. First lets check the database. Create a new database and creata a new table for your project. Here i am working with just one table ie tblUser.

CREATE TABLE [dbo].[tblUser](
    [Id] [int] IDENTITY(1,1) NOT NULL,
    [name] [nvarchar](50) NULL,
    [Email] [nvarchar](50) NULL,
    [pass] [nvarchar](50) NULL
) ON [PRIMARY]


Now come back to the ASP project and create three pages, one for insert, second for show data and last one for edit & delete.

In the Insert page add the TextBoxes according to your table. Here you have to take TextBox for name, email and password. The design of insert page...

Insert into DB

Name :
Email :
Password :
Confirm Password :

Here I have show with TextBox with validations.
Now lets check the coding of the insert page.

SqlConnection con = new SqlConnection(WebConfigurationManager.ConnectionStrings["DemoDBConnectionString"].ToString());

protected void btnSave_Click(object sender, EventArgs e)
{
	SqlDataAdapter da;

	try
	{
		/* Check Email is already present or not */
		DataTable dt_email = new DataTable();
		da = new SqlDataAdapter("select * from tblUser where email='" + txtEmail.Text.Trim() + "'", con);
		da.Fill(dt_email);
		if (dt_email.Rows.Count > 0)
		{
			lblMessage.Text = "Email already exists.";
			lblMessage.ForeColor = Color.Red;
			return;   // important because it helps not to use else part
		}
		/* End chekcing */

		/* Entry into database */
		con.Open();
		SqlCommand cmd = new SqlCommand("INSERT INTO [DemoDB].[dbo].[tblUser] ([name],[Email] ,[pass]) VALUES ('" + txtName.Text.Trim() + "','" + txtEmail.Text.Trim() + "' ,'" + txtPassword.Text.Trim() + "')", con);
		cmd.Connection = con;
		if (cmd.ExecuteNonQuery() == 1)
		{
			lblMessage.Text = "Successfully done !";
			lblMessage.ForeColor = Color.Green;
		}
		else
		{
			lblMessage.Text = "Error !";
			lblMessage.ForeColor = Color.Red;
		}

		/* end entry */
	}
	catch (Exception ae)
	{
		lblMessage.Text = ae.Message;
		lblMessage.ForeColor = Color.Red;
	}
	finally
	{
		con.Close();
	}
}

Now the inserting is over. Now its time to show the data into show page. In show page we are using only a GridView to show the data. Lets check once.


Show page is also over. Its time for edit and delete. For this we will code in edit page. Check the front coding of the GridView.


Now lets check the coding to edit or delete the data. Previously in show page we are showing the GridView as AutoColumnGenerator=true. But here we made it false. And using a fillgrid() method to bind the GridView.
SqlConnection con = new SqlConnection(WebConfigurationManager.ConnectionStrings["DemoDBConnectionString"].ToString());

private void fillgrid()
{
	SqlDataAdapter da = new SqlDataAdapter("select * from tblUser",con);
	DataTable dt = new DataTable();
	da.Fill(dt);
	GridView1.DataSource = dt;
	GridView1.DataBind();
}

protected void GridView1_RowDeleting(object sender, GridViewDeleteEventArgs e)
{
	try
	{
		string ID = ((Label)GridView1.Rows[e.RowIndex].FindControl("lblId")).Text;

		/* query to update db*/
		con.Open();
		SqlCommand cmd = new SqlCommand("delete tblUser  where id='" + ID + "'", con);
		cmd.Connection = con;
		if (cmd.ExecuteNonQuery() == 1)
		{
			lblMsg.Text = "Done !";
			lblMsg.ForeColor = Color.Green;
		}
		else
		{
			lblMsg.Text = "Error !";
			lblMsg.ForeColor = Color.Red;
		}
		/* end query */
	}
	catch (Exception ae)
	{
		lblMsg.Text = ae.Message;
		lblMsg.ForeColor = Color.Red;
	}
	finally
	{
		con.Close();
	}
	GridView1.EditIndex = -1;
	fillgrid();
}

protected void GridView1_RowUpdating(object sender, GridViewUpdateEventArgs e)
{
	try
	{
		string ID = ((Label)GridView1.Rows[e.RowIndex].FindControl("lblId")).Text;

		string name = ((TextBox)GridView1.Rows[e.RowIndex].FindControl("txtName")).Text;
		string pass = ((TextBox)GridView1.Rows[e.RowIndex].FindControl("txtPass")).Text;

		/* query to update db*/
		con.Open();
		SqlCommand cmd = new SqlCommand("update tblUser set name='" + name + "', pass ='" + pass + "' where id='" + ID + "'", con);
		cmd.Connection = con;
		if (cmd.ExecuteNonQuery() == 1)
		{
			lblMsg.Text = "Done !";
			lblMsg.ForeColor = Color.Green;
		}
		else
		{
			lblMsg.Text = "Error !";
			lblMsg.ForeColor = Color.Red;
		}
		/* end query */
	}
	catch (Exception ae)
	{
		lblMsg.Text = ae.Message;
		lblMsg.ForeColor = Color.Red;
	}
	finally
	{
		con.Close();
	}
	GridView1.EditIndex = -1;
	fillgrid();
}

protected void GridView1_RowEditing(object sender, GridViewEditEventArgs e)
{
	GridView1.EditIndex = e.NewEditIndex;
	fillgrid();
}

protected void GridView1_RowCancelingEdit(object sender, GridViewCancelEditEventArgs e)
{
	GridView1.EditIndex = -1;
	fillgrid();
}

Now run the project and check your db to be filled or not. Download the full source code to execute.

Thursday, July 10, 2014

Add MySQL Database with .NET Application in C#


In this article I will show you how to add a MySQL database with your .NET application in C#.

For this you need to add MySql.Data.dll as a reference in your project. You can download the dll from here. After downloading the dll select your project and right click on the project, click on the add reference menu. Then browse the dll to add it.

After adding add a new namespace in your .cs page.

using MySql.Data.MySqlClient;

Now after this create a new string which will act as your connection string.

string MySqlConn = "Server=<Ip address>;Port=<Port no>;
                  Database=<Database name>;Uid=<Username>;Pwd=<Password>;";

Generally use port no 3306 as port no in your connection string.

Now to create a new connection

Code:
MySqlConnection con_my = new MySqlConnection(MySqlConn);

Now for command write the follow code

MySqlCommand cmd_my;            
cmd_my = con_my.CreateCommand();
cmd_my.CommandText = "Select * from <table name>";

Now to get the value into a datatable add these.

MySqlDataAdapter da_my1 = new MySqlDataAdapter(cmd_my);
DataTable dt_my1 = new System.DataDataTable();
da_my1.Fill(dt_my1);

If you want to perform any insert, update, delete query then these are the code to proceed.

con_my.Open();
MySqlCommand cmd_my1;
cmd_my1 = con_my.CreateCommand();
cmd_my1.CommandText = "INSERT INTO <tblname>(col1,clo2,col3) 
                VALUES('" + data1 + "','" + datat2 + "','" + data3) + "')";
cmd_my1.ExecuteNonQuery();  // Returns no of row(s)affected
con_my.Close();

So add the MySQL database and enjoy...

Wednesday, May 21, 2014

Get Identity after inserting into database in Ms. SQL Server

Suppose we have a table named tblUser with coloumn name
Id int auto increment primary key
Name nvarchar(255)
Email nvarchhar(255)

Now after inserting a value into tblUser an Id will automatic generate as Id. Now how will you retrieve that Id. Very simple.

After inserting code place the bellow code

SELECT @@IDENTITY

This one will return you the Id of the inserted row.

How to bind a DataGridView in a Windows project C#

Here I will show you how to bind a DataGridView in a windows application with a DataSet and SQLDataSource.

First  create a new windows project and add a new form. After that select a DataGridView and drag and drop into the form.


Now choose a new DataSource against the DataGridView.

Select New DataSource and click on the "Add Project Data Source".


Select the Database to proceed.


Now select the DataSet to continue.


Select the ConnectionString and click on the Next button.


Now after that choose the table name which one you want to display. You can choose multiple tables or views.


After that click on the Finish button to complete the process. Now in the bottom of the project you can see there is a DataSet named tblMessage. Open that and remove the columns that you don't want to display.


Now in the View Code section you can see in the Form_Load a new line of code is added. This one is binding the DataGdridView with the DataSet.

Now run the project and you will see in the output your database's table in the DataGridView.


Tuesday, March 4, 2014

ASP default Login form using C#

To use the ASP default Login form you need to add a login control into your web form .


Quiz software using C# (Windows application) with Ms. Access

In the previous post I had show you how to use Ms. Access as your database. Now in this article I will explain you how to create a Quiz software. First take a look about the database.

Here I have done all the program in just one form. And using panel I did all the hiding and showing data.

Table Question (tblQuestion)

  • ID (Number auto increment by 1)
  • Question (Text)
  • Option1 (Text)
  • Option2 (Text)
  • Option3 (Text)
  • Option4 (Text)
  • Answer (Text)

Monday, February 24, 2014

How to execute database query in ASP.NET using Store Procedure

To run database query is an important part to process a website or an application. In ASP.NET we take a help of a class SqlCommand. And for this you need to add a namespace System.Data.SqlClient. 

The actual process to run the query in application is

SqlCommand cmd = new SqlCommand("<Store procedure name>", con); 

You can pass the store procedure name or you can place the sql query insist of store procedure.

And to pass any type of arguments you need to do like this.

Thursday, February 6, 2014

Database Connection in ASP.NET C# Connection String

Database is an integral part of any websites. Its the main part of the whole web technology. So we have to take it with a little bit extra care.... :P

So in this article We are going to watch how to connect your database with your ASP.NET application.

In your application you there is a file called web.config where we have to write our connectionString. You can find it from Solution Explorer. If you didn't find the Solution Explorer then don't worry, here is the path to open Solution Explorer.

View -> Solution Explorer. or press Ctrl+W,S.

Popular Posts

Pageviews