Wednesday, April 23, 2014

How to return more than one table from store procedure

Return a single table full of data from store procedure we can use a DataTable but to return multiple tables from store procedure we have to use DataSet. DataSet is a bunch of DataTables. So the following code you can use to return single table.


SqlCommand cmd = new SqlCommand("sp_Login", con);
cmd.CommandType = CommandType.StoredProcedure;
 
cmd.Parameters.Add("@Email", SqlDbType.NVarChar).Value = email;
cmd.Parameters.Add("@Password", SqlDbType.NVarChar).Value = password;
 
cmd.Connection = con;
if (con.State == ConnectionState.Closed)
{
   con.Open();
}
SqlDataReader dr = cmd.ExecuteReader();
DataTable dt = new DataTable();
dt.Load(dr);
 
return dt;

Now the store procedure is something like this one.


CREATE PROCEDURE sp_Test
    @Email nvarchar(255)
AS
BEGIN
    SET NOCOUNT ON;

    select * from <tblName> whhere email = @Email
END

Its time to found how to get multiple table value in one DataSet.

Suppose the store procedure is like ...


CREATE PROCEDURE sp_Test
AS
BEGIN
    
    SET NOCOUNT ON;
 
    select * from Tbl1
    select * from Tbl2
    select * from Tbl3
    select * from Tbl4
END

And the C# code will be...


SqlCommand cmd = new SqlCommand("sp_test", con);
cmd.CommandType = CommandType.StoredProcedure;
 
cmd.Connection = con;
if (con.State == ConnectionState.Closed)
{
    con.Open();
}
 
SqlDataAdapter sda = new SqlDataAdapter(cmd);
DataSet ds = new DataSet();
sda.Fill(ds);
con.Close();
 
// Retrieving total stored tables from DataSet.              
DataTable dt1 = ds.Tables[0];
DataTable dt1 = ds.Tables[1];
DataTable dt1 = ds.Tables[2];
DataTable dt1 = ds.Tables[3];

So I hope you have found the solution of your problem. So enjoy the coding :)  

Saturday, April 19, 2014

Access Session Variable in ASHX Files ASP.NET

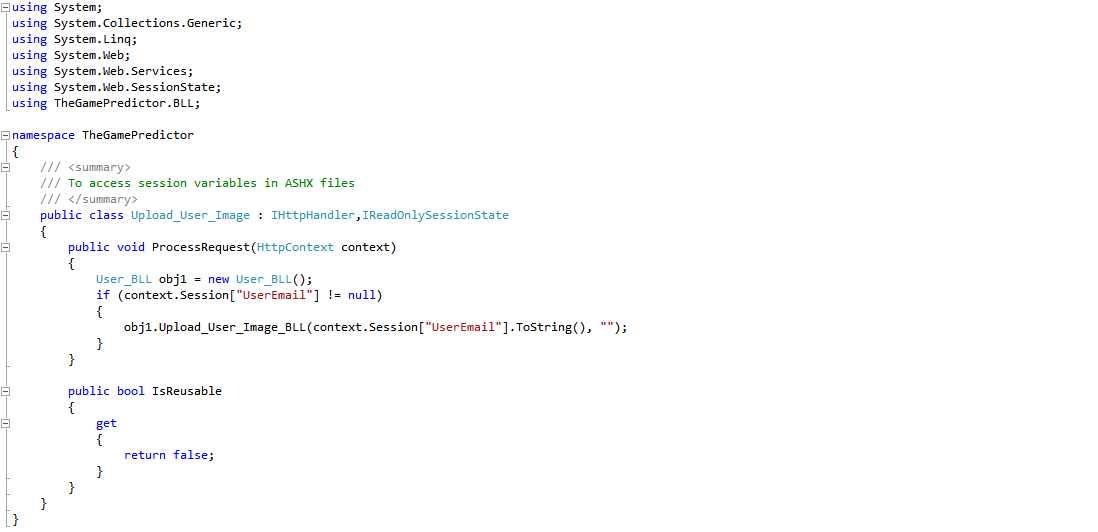
Many of us has found an obstacle to access the session variables in our generic handler. Here i found the right way to access the session variables in our handler file (.ashx).

For that you need to import an extra namespace,

using System.Web.SessionState;

Then inherit the class with an extra interface named  IReadOnlySessionState.


Now using the context variable you can access the session variable. So simple and so easy.

Reference : hanselman.com

Multiple File Uploading Asynchronously using Jquery and Generic Handler in ASP.NET C#

To days topic is File Upload Asynchronously using Jquery and Generic Handler in ASP.NET C#. In this article I will show you how to upload a single file or multiple files in your ASP.NET project using jquery and generic handler. 

So, what actually Generic Handler is?

Some ASP.NET files are dynamically generated. They are generated with C# code or disk resources. These files do not require web forms. Instead, an ASHX generic handler is ideal. It can dynamically return an image from a query string, write XML, or any other data.
 For further information you can follow this link. Click  here.

Lets come directly to the code.

For this project you need a normal  asp file uploader. So add a file uploader into your project. And also add a folder named "Uploader" in which the files will be dumped. 

then add a generic handler into your project and named it Uploader.ashx


After this add a script tag and write these code into that tag.

Now open the Uploader.ashx file and write the following code.
Now add some additional files like css, js, swf and run the code. Enjoying your uploading.

Download the  full source code here.

Tuesday, April 15, 2014

File Uploading Without Page Loading Asynchronously with AJAX Control Tool Kit in ASP.NET C#

It this article we will discuss about the file uploading without refreshing the page asynchronously in ASP.NET C#. For that we need the AJAX Control Toolkit. For that you have to download the AJAX Control Toolkit. I have previously shared an article on that. You can visit this here.

Before proceeding you need to get info about AsyncFileUpload.

Add the Register into the page first.

   1:  <%@ Register Assembly="AjaxControlToolkit" Namespace="AjaxControlToolkit" TagPrefix="cc1" %>


And then put the script manager into the page.


   1:  <asp:ScriptManager ID="sm1" runat="server" />


And now its time for the AsyncFileUpload .


   1:  <cc1:AsyncFileUpload ID="AsyncFileUpload1" Width="400px" runat="server" 
   2:          OnClientUploadError="uploadError" 
   3:          OnClientUploadStarted="StartUpload"
   4:          OnClientUploadComplete="UploadComplete"
   5:          CompleteBackColor="Lime" UploaderStyle="Modern" 
   6:          ErrorBackColor="Red" 
   7:          ThrobberID="Throbber" 
   8:          onuploadedcomplete="AsyncFileUpload1_UploadedComplete" 
   9:          UploadingBackColor="#66CCFF" />

Put some additional controls for a better uploading experience.


   1:  <asp:Label ID="Throbber" runat="server" Style="display: none">
   2:              <img src="Images/indicator.gif" align="absmiddle" alt="loading" />
   3:          </asp:Label>
   4:          <br />
   5:          <br />
   6:          <asp:Label ID="lblStatus" runat="server" Style="font-family: Arial; font-size: small;"></asp:Label>


Go to Head section and add a script tag and put the following code there.


   1:  <script type="text/javascript" language="javascript">
   2:      
   3:          function uploadError(sender,args)
   4:          {
   5:            document.getElementById('lblStatus').innerText = args.get_fileName(), "<span style='color:red;'>" + args.get_errorMessage() + "</span>";
   6:          }
   7:          
   8:          function StartUpload(sender,args)
   9:          {
  10:              document.getElementById('lblStatus').innerText = 'Uploading Started.';
  11:          }
  12:          
  13:          function UploadComplete(sender,args)
  14:          {
  15:              var filename = args.get_fileName();
  16:              var contentType = args.get_contentType();
  17:              var text = "Size of "  + filename + " is " + args.get_length() + " bytes";
  18:              if (contentType.length > 0)
  19:              {
  20:                  text += " and content type is '" + contentType + "'.";
  21:              }
  22:              document.getElementById('lblStatus').innerText = text;
  23:          }
  24:      </script>


Now go to the code page in the cs file and add this method under Page_Load method.


protected void AsyncFileUpload1_UploadedComplete(object sender, AjaxControlToolkit.AsyncFileUploadEventArgs e)
    {
        System.Threading.Thread.Sleep(5000);
        if (AsyncFileUpload1.HasFile)
        {
            string strPath = MapPath("~/Uploads/") + Path.GetFileName(e.filename);
            AsyncFileUpload1.SaveAs(strPath);
        }
        
    }


Now test your uploader and enjoy.

Download the full source code here.


Thursday, April 3, 2014

Web User Controls in ASP.NET C#

Web User Controls are the newest process to add different parts of a website instead of Master Page concept. Here you can add the tools according to your format, and don't need to move in a same master page every time. Its a better approach to build a website than the master page. 

To do so you need to know about the Register, its an assembly  which will add reference of your controls into your page.

<%@ Register TagPrefix="gp" TagName="UCFooter"  Src="~/Controls/Footer.ascx" %>

Adding the source of control along with out own tag name and tag prefix.

But before that you need to add a new control into your solution explorer. For that click on Add a New Item and add Web User Control.


Now add your design into the design part of your .ascx file and write the code of it according to that one.

Now its time to link up your control to your page. Go to your page and add a register at the top of the code.

<%@ Register TagPrefix="gp" TagName="UCFooter"  Src="~/Controls/Footer.ascx" %>

And then using this add the control into your page like this.

<gp:UCFooter id="footer"  runat="server"  />

Now run your project it will show your page along with your control.


Here we have four parts into this page.
  1. Header (Control_Header)
  2. Menu (Control_Menu)
  3. Content (Page)
  4. Footer (Control_Footer)
So add these controls any where in any page and enjoy a better and more flexible method to build your site.

Download the full source code here.


Popular Posts

Pageviews