Sunday, July 19, 2015

E-ICEBLUE, Your Office Development Master

E-ICEBLUE, Your Office Development Master
iText sharp is one of the 3rd party component to use for PDF, Word, Excel, Power Point creation and others in .NET, Now here are E-ICEBLUE to make your office experience even better with .NET. It comes with both C# and VB.NET component. Just download and add the dll into your solution, use their code to create your PDF, Word, Excel or Power Point.

What E-ICEBLUE offers ?

Here are the full list of offers that E-ICEBLUE have for you.
  1. Spire.Doc
  2. Spire.DocViewer
  3. Spire.XLS
  4. Spire.Presentation
  5. Spire.PDF
  6. Spire.PDFViewer
  7. Spire.PDFConverter
  8. Spire.DataExport
  9. Spire.BarCode
All these are offered by E-ICEBLUE to make your Office experience better. Demos are available in their site. Lets see how it works..

How it works? 

For each and every product you have to download the installation file and install this. Now add the add the dll files into your project, as example..

For Spire.Doc download the file and install it in its default path(C:\Program Files\e-iceblue\Spire.Doc). Now add the dll file into your project by browsing the file into default folder or where you have installed. Similarly same thing goes for others also.

As you add the dll files into your project you have to add the namespaces into your VB or CS file. 

C#.NET
using Spire.Doc;
using Spire.Doc.Documents;

VB.NET
Imports Spire.Doc
Imports Spire.Doc.Documents

As you add those namespaces you are now able to access the class to create your doc,
excel,power point and pdf files just by calling the method. 

Let us see how to create a simple doc file in just few lines.

C#.NET
//Create word document
Document document = new Document();

//Create a new paragraph
Paragraph paragraph = document.AddSection().AddParagraph();

//Append Text
paragraph.AppendText("Word file by using Spire.Doc");

//Save doc file.
document.SaveToFile("Sample.doc", FileFormat.Doc);

//Launching the MS Word file.
try
{
System.Diagnostics.Process.Start("Sample.doc");
}
catch { }

VB.NET
'Create word document
Dim document_Renamed As New Document()

'Create a new paragraph
Dim paragraph_Renamed As Paragraph = document_Renamed.AddSection().AddParagraph()

'Append Text
paragraph_Renamed.AppendText("Word file by using Spire.Doc")

'Save doc file.
document_Renamed.SaveToFile("Sample.doc", FileFormat.Doc)

'Launching the MS Word file.
Try
System.Diagnostics.Process.Start("Sample.doc")
Catch
End Try


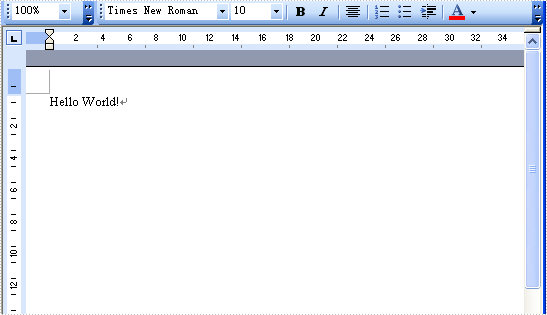
Output:

How simple to create a doc file. Same thing happens also for Excel, PDF, Power Point. Here I have seen only for Windows application, they have provided also in Silverlight and WPF. 

To check all tutorials you can go for following links.
  1. Spire.Doc
  2. Spire.DocViewer
  3. Spire.XLS
  4. Spire.Presentation
  5. Spire.PDF
  6. Spire.PDFViewer
  7. Spire.PDFConverter
  8. Spire.DataExport
  9. Spire.BarCode
Also you can use the API of Spire.Doc, Spire.DocViewer, Spire.XLS, Spire.Presentation, 
Spire.PDF, Spire.PDFViewer. For that click here.

Important links:

For products visit E-ICEBLUE.
For tutorial visit E-ICEBLUE Tutorials.
For video tutorials E-ICEBLUE Video Tutorials
For purchasing visit E-ICEBLUE.

Friday, July 3, 2015

Image slider from a folder in MVC 4.0

In this post we will learn about to create a HTML JQuery CSS slider where images are binding from a specific folder. Means you just have to add a folder name and rest of the work will be take care of the code.

All we need a pack of JQuery slider. As I found one from my hard disk, I will do with this. 

Step 1:

After creating a new project you have to put all the resources like images, JavaScript and css files into new solutions. We have taken a empty MVC project as Razor view engine. 


As we all can see the assets folder is the resources that we have imported from our HTML Jquery. img folder in assets is the main folder from which we are fetching the images to create a slider.

Step 2:

As we take an empty project we have to build a new controller, so we created a new controller named HomeController and in model folder created a new model named Slider.cs.

Step 3:

Now lets create the Slider.cs file first. It will took two things. One is src (this is the source of the image) & second one is title (Title and alt of the image)

namespace MVCImageSliderFromFolder.Models
{
    public class Slider
    {
        public string src { get; set; }
        public string title { get; set; }
    }
}


Step 4:

Now its time for the controller. This is the main thing to get manage all the images and send that to View part to show.

Before proceeding we must have to discuss about the algorithm, which is actually happening. 

Get the Folder Name -> Search all the images(.jpg, .png and others...) -> Make a list of that with source and title -> Send to view for showing the slider.

So lets proceed with searching all the files/images from the desired folder. 

string[] filePaths = Directory.GetFiles(Server.MapPath("~/assets/img/"));

In this way we will get all the files in the folder ~/assets/img. Now we have to create a List of type Slider to pass this to View. To do this...

List<Slider> files = new List<Slider>();
foreach (string filePath in filePaths)
{
      string fileName = Path.GetFileName(filePath);
      files.Add(new Slider{
            title= fileName.Split('.')[0].ToString(),
            src = "../assets/img/" + fileName
      });
}

Now in the List files we have the source and the title of all the files/images present in img folder. Now send this to View by    return View(files);

Step 5:

Now the last part is left to do. Bind the model to View part and your slider is ready. 


First of all add the resources at the top of the HTML file (Header section).

<link rel="stylesheet" href="../assets/bjqs.css">
<link href='http://fonts.googleapis.com/css?family=Source+Code+Pro|Open+Sans:300' rel='stylesheet' type='text/css'>
<link rel="stylesheet" href="../assets/demo.css">

<script src="http://code.jquery.com/jquery-1.7.1.min.js"></script>
<script src="../assets/js/bjqs-1.3.min.js"></script>
<script src="../assets/js/libs/jquery.secret-source.min.js"></script>

Now add the slider, as we are dealing with only the slider we don't need to worry about all other stuffs. If it is a full web page then you can add a Partial View and pass the Model on that and create the slider portion in that Partial View.

To create the slider....

<div id="banner-fade">
    <ul class="bjqs">
       @foreach (var item in Model)
       {
           <li>
               <img src='@Html.DisplayFor(modelItem => item.src)'
                     title='@Html.DisplayFor(modelItem => item.title)' alt="">
           </li>
       }
    </ul>
</div>

Write a loop to create the li within ul. All you is done. Only left is to call the javaScript function to run the slider. To call this

<script>
jQuery(function ($) {
        $('.secret-source').secretSource({
             includeTag: false
        });

        $('#banner-fade').bjqs({
             height: 320,
             width: 620,
             responsive: true
        });
});
</script>

This one will differ from slider to slider, as I took this one they have called it in this way, in other slider calling of the JavaScript functions are different. 

Now build your project and run this. Enjoy the slider.

Download the full source code here.

Popular Posts

Pageviews