Tuesday, May 20, 2014

Use Google Captcha in your ASP.NET Project in C#

Using captcha in your site making your site much better secure against hackers and their scripts. So in this article I will show you how to use Google recaptcha in your asp.net project.

First download the ReCaptcha.dll and add as a reference in your project. You can download this from here. Before starting this you need to register yourself to get a public & private key of your Google apps.

Now add the register code in your aspx page.


 <%@ Register TagPrefix="recaptcha" Namespace="Recaptcha" Assembly="Recaptcha" %>

And now add the following code in your aspx code, where you want to place your captcha.


<asp:Label Visible="false" ID="lblResult" runat="server" />
 
<recaptcha:recaptchacontrol id="recaptcha" runat="server" publickey="<Your public key>"
privatekey="<Your private key>" Theme="clean" />

In the code behind on a button click add the the code..


protected void btnSubmit_Click(object sender, EventArgs e)
{
      recaptcha.Validate();
      if(Page.IsValid && recaptcha.IsValid)
      {
           lblResult.Text = "You Got It!";
           lblResult.ForeColor = Drawing.Color.Green;
      }
      else
      {
           lblResult.Text = "Incorrect";
           lblResult.ForeColor = Drawing.Color.Red;
      }     
}

Your captcha is ready. Run the project and have fun.

Output :

Download the source code here.


Saturday, May 17, 2014

How to convert a string into array in c#

Many times its required to convert a string into an array. In this tutorial I will show how to convert a string into an array.

First take a textbox names TextBox1 and a button to convert it into array. Also take a label to show the result.

On the button click event write the following code..


private void button1_Click_1(object sender, EventArgs e)
{
    char []name ;
    int i = 0;
    int count = 0;
    /* Converting string into array */
    name = textBox1.Text.ToArray();   

    /* Using for loop */
    for (i = 0; i < name.Length;i++ )
    {
        label1.Text = label1.Text + Convert.ToString(name[i]);
    }  

    /* Using foreach loop */
    foreach (char a in name)
    {
         label1.Content = label1.Content + Convert.ToString(name[i]);
    }
}

Thursday, May 15, 2014

Insert Data using WCF Into Database in ASP.NET C#

In this article I will show you how to insert data into database using Windows Communication Foundation(W.C.F.). 

For that first you need to create a WCF Service Application.


Now to insert data into database you need to get help of two things.


  • OperationContract (Add services operation)
  • DataConntract (add type to services operation)
Now in the IService1.cs create your own method named InsertData(UserData user)


[OperationContract]
string InsertUserDetails(UserData user);

Now add the UserData class with its members  at IService1.cs


public class UserData
    {
        string password = string.Empty;
        string country = string.Empty;
        string email = string.Empty;
 
        [DataMember]
        public string Password
        {
            get { return password; }
            set { password = value; }
        }
        [DataMember]
        public string Country
        {
            get { return country; }
            set { country = value; }
        }
        [DataMember]
        public string Email
        {
            get { return email; }
            set { email = value; }
        }
    }

Now add the following code in the Service1.svc


public string InsertUserDetails(UserData userInfo)
        {
            string Message;
            SqlConnection con = new SqlConnection("Data Source=.;Initial Catalog=WCF_Demo;Trusted_Connection=true");
            con.Open();
            SqlCommand cmd = new SqlCommand("insert into RegistrationTable(Password,Country,Email) values(@Password,@Country,@Email)", con);
            cmd.Parameters.AddWithValue("@Password", userInfo.Password);
            cmd.Parameters.AddWithValue("@Country", userInfo.Country);
            cmd.Parameters.AddWithValue("@Email", userInfo.Email);
            int result = cmd.ExecuteNonQuery();
            if (result == 1)
            {
                Message ="successful.";
            }
            else
            {
                Message = "Sorry Unsuccessful.";
            }
            con.Close();
            return Message;
        }

Now run the Service1.svc of the project. and will get an url in the browser.


Now create another project(Website) and add a new webform.


Now add a web reference to the project by right clicking on the project name in solution explorer.


And after adding this reference you will find that in your solution explorer.


Now add some textbox and a button to make a registration form. Something looking like this one.


Now in the code behind add the code following.


using System;
using System.Collections.Generic;
using System.Linq;
using System.Web;
using System.Web.UI;
using System.Web.UI.WebControls;
using WCF_Insert.ServiceReference1;
 
namespace WCF_Insert
{
    public partial class WebForm1 : System.Web.UI.Page
    {
        ServiceReference1.Service1Client objServiceClientobjService = new ServiceReference1.Service1Client();
        protected void Page_Load(object sender, EventArgs e)
        {
 
        }
 
        protected void Button1_Click(object sender, EventArgs e)
        {
            UserDetails userInfo = new UserDetails();
            userInfo.Password = TextBoxPassword.Text;
            userInfo.Country = TextBoxCountry.Text;
            userInfo.Email = TextBoxEmail.Text;
            string result = objServiceClientobjService.InsertUserDetails(userInfo);
            LabelMessage.Text = result;
        }
    }
}

Before closing the application create a table named RegistrationTable with coloumns of..


CREATE TABLE [dbo].[RegistrationTable]
(
      [Password] [varchar](20) NOT NULL,
      [Country] [varchar](100) NOT NULL,
      [Email] [varchar](200) NOT NULL
)

Now its over. Run your project and enjoy the WCF.

Tuesday, May 13, 2014

Loading a .TXT file into a Label using C# in ASP.NET

Some times its very important to get and show data from an external file like .txt file. So in this example I will show you how to get the data of a .txt file in a label or a text box in ASP.NET using C#.

Create a new project and add a web form. In the App_Data folder create a txt file and put some data into it. We will get the value of from that txt file.

On the page load event of your web form write the following code.


if (!this.IsPostBack)
{
    using (StreamReader stRead = 
               new StreamReader(Server.MapPath("~/App_Data/file.txt")))
    {
        int i = 0;
        string name = string.Empty;
        string valueFromtoEnd = string.Empty;
 
        while (!stRead.EndOfStream)
        {
            if (i > 2 && i <= 4)
            {
                valueFromtoEnd += stRead.ReadLine();
            }
            else
            {
                Label1.Text = Label1.Text + stRead.ReadLine() + "<br />";
            }
            i++;
            if (i > 4)
            {
                break;
            }
        }
    }
}


It will show the text as in the .txt file.
If you want to show it in a text box just change the label into a text box.

Download the full source code here.

Get HTML Drop Down List value in code behind C#

Few days ago I stuck into a problem , I need to get the value of from a HTML drop down list in my c# code behind page. So I started searching and found the solution.  Very simple solution indeed. Just a single line code to end the problem.

Suppose the drop down list code is


<select name="cars">
  <option value="volvo">Volvo XC90</option>
  <option value="saab">Saab 95</option>
  <option value="mercedes">Mercedes SLK</option>
  <option value="audi">Audi TT</option>
</select>

And a ASP button to get the value..


<asp:Button ID="Button1" runat="server" Text="Button" onclick="Button1_Click" />

Now on the C# page write the bellow code.


var car = Request["cars"];
Response.Write(car.ToString());

If you are using ASP Drop Down List then the code will be little bit different.


<asp:DropDownList ID="DropDownList1" runat="server">
   <asp:ListItem>Item1</asp:ListItem>
   <asp:ListItem>Item2</asp:ListItem>
   <asp:ListItem>Item3</asp:ListItem>
</asp:DropDownList>

And on button click..


Response.Write(DropDownList1.SelectedValue.ToString());
Response.Write(DropDownList1.SelectedItem.Text.ToString());

Now enjoy the code..

Monday, May 5, 2014

Add User Control Tool dynamically in ASP.NET C#

In previous post I have wrote about UserControlTool. In this post I will show how to add the UserControlTool dynamically in an aspx page.

First add the folder as a namespace into the .CS page.

Suppose project name is "asx_add" and in the folder "tool" all the user control tools are presented.

So add the namespace.

using asx_add.tools;

Now add the line bellow to add the control tool.
private Header h1;
 
h1 = (Header)LoadControl("~/tools/Header.ascx");
this.Controls.Add(h1);
PlaceHolder1.Controls.Add(h1);

Now run the code and you will found that the user control is added to your web page.

Download the full source code here.

Wednesday, April 23, 2014

How to return more than one table from store procedure

Return a single table full of data from store procedure we can use a DataTable but to return multiple tables from store procedure we have to use DataSet. DataSet is a bunch of DataTables. So the following code you can use to return single table.


SqlCommand cmd = new SqlCommand("sp_Login", con);
cmd.CommandType = CommandType.StoredProcedure;
 
cmd.Parameters.Add("@Email", SqlDbType.NVarChar).Value = email;
cmd.Parameters.Add("@Password", SqlDbType.NVarChar).Value = password;
 
cmd.Connection = con;
if (con.State == ConnectionState.Closed)
{
   con.Open();
}
SqlDataReader dr = cmd.ExecuteReader();
DataTable dt = new DataTable();
dt.Load(dr);
 
return dt;

Now the store procedure is something like this one.


CREATE PROCEDURE sp_Test
    @Email nvarchar(255)
AS
BEGIN
    SET NOCOUNT ON;

    select * from <tblName> whhere email = @Email
END

Its time to found how to get multiple table value in one DataSet.

Suppose the store procedure is like ...


CREATE PROCEDURE sp_Test
AS
BEGIN
    
    SET NOCOUNT ON;
 
    select * from Tbl1
    select * from Tbl2
    select * from Tbl3
    select * from Tbl4
END

And the C# code will be...


SqlCommand cmd = new SqlCommand("sp_test", con);
cmd.CommandType = CommandType.StoredProcedure;
 
cmd.Connection = con;
if (con.State == ConnectionState.Closed)
{
    con.Open();
}
 
SqlDataAdapter sda = new SqlDataAdapter(cmd);
DataSet ds = new DataSet();
sda.Fill(ds);
con.Close();
 
// Retrieving total stored tables from DataSet.              
DataTable dt1 = ds.Tables[0];
DataTable dt1 = ds.Tables[1];
DataTable dt1 = ds.Tables[2];
DataTable dt1 = ds.Tables[3];

So I hope you have found the solution of your problem. So enjoy the coding :)  

Saturday, April 19, 2014

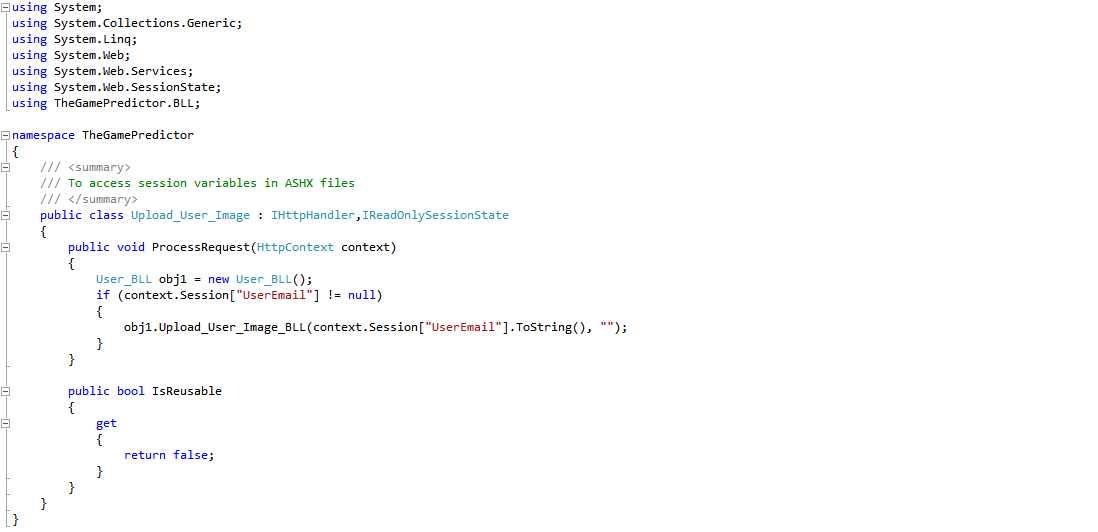
Access Session Variable in ASHX Files ASP.NET

Many of us has found an obstacle to access the session variables in our generic handler. Here i found the right way to access the session variables in our handler file (.ashx).

For that you need to import an extra namespace,

using System.Web.SessionState;

Then inherit the class with an extra interface named  IReadOnlySessionState.


Now using the context variable you can access the session variable. So simple and so easy.

Reference : hanselman.com

Multiple File Uploading Asynchronously using Jquery and Generic Handler in ASP.NET C#

To days topic is File Upload Asynchronously using Jquery and Generic Handler in ASP.NET C#. In this article I will show you how to upload a single file or multiple files in your ASP.NET project using jquery and generic handler. 

So, what actually Generic Handler is?

Some ASP.NET files are dynamically generated. They are generated with C# code or disk resources. These files do not require web forms. Instead, an ASHX generic handler is ideal. It can dynamically return an image from a query string, write XML, or any other data.
 For further information you can follow this link. Click  here.

Lets come directly to the code.

For this project you need a normal  asp file uploader. So add a file uploader into your project. And also add a folder named "Uploader" in which the files will be dumped. 

then add a generic handler into your project and named it Uploader.ashx


After this add a script tag and write these code into that tag.

Now open the Uploader.ashx file and write the following code.
Now add some additional files like css, js, swf and run the code. Enjoying your uploading.

Download the  full source code here.

Tuesday, April 15, 2014

File Uploading Without Page Loading Asynchronously with AJAX Control Tool Kit in ASP.NET C#

It this article we will discuss about the file uploading without refreshing the page asynchronously in ASP.NET C#. For that we need the AJAX Control Toolkit. For that you have to download the AJAX Control Toolkit. I have previously shared an article on that. You can visit this here.

Before proceeding you need to get info about AsyncFileUpload.

Add the Register into the page first.

   1:  <%@ Register Assembly="AjaxControlToolkit" Namespace="AjaxControlToolkit" TagPrefix="cc1" %>


And then put the script manager into the page.


   1:  <asp:ScriptManager ID="sm1" runat="server" />


And now its time for the AsyncFileUpload .


   1:  <cc1:AsyncFileUpload ID="AsyncFileUpload1" Width="400px" runat="server" 
   2:          OnClientUploadError="uploadError" 
   3:          OnClientUploadStarted="StartUpload"
   4:          OnClientUploadComplete="UploadComplete"
   5:          CompleteBackColor="Lime" UploaderStyle="Modern" 
   6:          ErrorBackColor="Red" 
   7:          ThrobberID="Throbber" 
   8:          onuploadedcomplete="AsyncFileUpload1_UploadedComplete" 
   9:          UploadingBackColor="#66CCFF" />

Put some additional controls for a better uploading experience.


   1:  <asp:Label ID="Throbber" runat="server" Style="display: none">
   2:              <img src="Images/indicator.gif" align="absmiddle" alt="loading" />
   3:          </asp:Label>
   4:          <br />
   5:          <br />
   6:          <asp:Label ID="lblStatus" runat="server" Style="font-family: Arial; font-size: small;"></asp:Label>


Go to Head section and add a script tag and put the following code there.


   1:  <script type="text/javascript" language="javascript">
   2:      
   3:          function uploadError(sender,args)
   4:          {
   5:            document.getElementById('lblStatus').innerText = args.get_fileName(), "<span style='color:red;'>" + args.get_errorMessage() + "</span>";
   6:          }
   7:          
   8:          function StartUpload(sender,args)
   9:          {
  10:              document.getElementById('lblStatus').innerText = 'Uploading Started.';
  11:          }
  12:          
  13:          function UploadComplete(sender,args)
  14:          {
  15:              var filename = args.get_fileName();
  16:              var contentType = args.get_contentType();
  17:              var text = "Size of "  + filename + " is " + args.get_length() + " bytes";
  18:              if (contentType.length > 0)
  19:              {
  20:                  text += " and content type is '" + contentType + "'.";
  21:              }
  22:              document.getElementById('lblStatus').innerText = text;
  23:          }
  24:      </script>


Now go to the code page in the cs file and add this method under Page_Load method.


protected void AsyncFileUpload1_UploadedComplete(object sender, AjaxControlToolkit.AsyncFileUploadEventArgs e)
    {
        System.Threading.Thread.Sleep(5000);
        if (AsyncFileUpload1.HasFile)
        {
            string strPath = MapPath("~/Uploads/") + Path.GetFileName(e.filename);
            AsyncFileUpload1.SaveAs(strPath);
        }
        
    }


Now test your uploader and enjoy.

Download the full source code here.


Popular Posts

Pageviews