Saturday, January 24, 2015

SQL Bulk copy from DataTable using XML

To copy data from DataTable or DataSet to SQL Server we need to use either foreach or for loop. It is OK when the count of rows is reasonable. But if the data is like 1 lakh or 1 core, then it is not possible to round the loop for such that time. Then what to do? A simple and easy way to follow is use XML. I am sure you all are more or less aware of this XML. Its a like the database with tags. Or I better to say its a database. It keeps data into a file with extension of  ".xml".

Our intention to convert the DataTable's data into an XML file and send it to server, where with the help of a stored procedure we will extract data and insert into the database table. So lets come see, how to do this...

First of all create a new database and create a new table, named it as you want. Database table structure will be like this.

Name NVarChar(255) not null
Adderss NVarChar(255) not null
Phone NvarChar(12) not null

OK, now we need to create a new DataTable  and put some data on it. Make sure your column and the database table's column are same.

DataTable dt = new DataTable();
dt.Columns.Add("Name");
dt.Columns.Add("Address");
dt.Columns.Add("Phone");

dt.Rows.Add("Arkadeep", "Kolkata", "123456890");
dt.Rows.Add("Saikat", "Chennai", "99999999");

dt.Rows.Add("Sucheta", "Delhi", "9876543210");


Now you have to convert this DataTable into XML. To do this copy and paste the following code after the DataTable section. 

private static string ConvertToXML(DataTable dt)
{
      DataSet dsBuildSQL = new DataSet();
      StringBuilder sbSQL;
      StringWriter swSQL;
      string XMLformat;
      try
      {
           sbSQL = new StringBuilder();
           swSQL = new StringWriter(sbSQL);
           dsBuildSQL.Merge(dt, true, MissingSchemaAction.AddWithKey);
           dsBuildSQL.Tables[0].TableName = "DataTable";
           foreach (DataColumn col in dsBuildSQL.Tables[0].Columns)
           {
               col.ColumnMapping = MappingType.Attribute;
           }
           dsBuildSQL.WriteXml(swSQL, XmlWriteMode.WriteSchema);
           XMLformat = sbSQL.ToString();
           return XMLformat;
       }
       catch (Exception sysException)
       {
           throw sysException;
       }
}


Call this method to convert the DataTable to XML. 

String xmlData = ConvertToXML(dt);

Now pass the value to the stored procedure like the following way.

SqlConnection conn = new SqlConnection(WebConfigurationManager.ConnectionStrings["connection"].ToString());
SqlCommand command = new SqlCommand("sp_InsertData '" + xmlData + "'", conn);
conn.Open();
command.ExecuteNonQuery();
conn.Close();


Now lets check the stored procedure sp_InsertData.

CREATE PROCEDURE sp_InsertData
(@xmlString VARCHAR(MAX))
AS
BEGIN

      DECLARE @xmlHandle INT
      DECLARE @stagingTable TABLE
      (
         [Name]               VARCHAR(50),
         [Address]            VARCHAR(50),
         [Phone]              VARCHAR(50)
      )
              
      EXEC sp_xml_preparedocument @xmlHandle output, @xmlString 

      INSERT INTO @stagingTable
      SELECT  [Name]    ,
                  [Address],
                  [Phone]    
      FROM  OPENXML (@xmlHandle, '/DataTable',1)
                        WITH ([Name]            varchar(50)       '@Name',
                                [Address]       varchar(50)       '@Address',
                                [Phone]         varchar(50)       '@Phone'
                               )

      INSERT INTO SampleData ([Name], [Address], [Phone])
            (SELECT [Name] , [Address],[Phone]FROM @stagingTable)
     
      EXEC sp_xml_removedocument @xmlHandle
END


Now run your project and after run this check your database table whether data has been inserted or not...

Thursday, January 15, 2015

Generate Genealogy view in ASP.NET C# using Google Organizational Chart

Previously I  have show you how to create a genealogy view of a family or a tree view in ASP.NET using C#. You can go through that link here.  But that process was some kind of orthodox concept to show the data, because we have used a primary structure of HTML table and put a huge code of all the buttons, labels and images present in the HTML table.

But in this article I will show you how to create a genealogy view of data coming from database with coding of just 20-25 lines. We will use Google organizer chart to create the tree view. Our only motive is to generate the parent and position (left & right) wise data presentation by fetching it from database.

So lets come to the database part first. I cut all other thing except name and parent no. If only one child is present it will show direct under the parent(neither in left nor in right) and two children will show to left and right according to their position in database. So you need to be careful to handle these kinds of small but very effective things when you will do yours.

I will first discuss about the Google organizational chart. Lets check how it works first. Here I am just pasting the  code which will generate the tree view. For more visit this link.

<script>
google.setOnLoadCallback(drawChart);
function drawChart() {
     var data = new google.visualization.DataTable();
     data.addColumn('string''Name');
     data.addColumn('string''Manager');
         
     data.addRows([['Mike',''], ['Jim''Mike'], ['Alice''Mike'],['Bob','Jim'],['Carol''Jim']]);

     var chart = new google.visualization.OrgChart(document.getElementById('chart_div'));
     chart.draw(data, { allowHtml: true });
}
</script>


This code is not similar to the code present in the website. I took only the things that will help me to do the primary things. Others can be added later.

All these codes are basically based on the data. Data containing of Mike, Jim, Alice, Bob etc. So if we can replace it with our value, which is coming from database then our work will be done. So first lets fetch the data from database and form a string like does here.

string s = "";
DataTable table = new DataTable();
table.Columns.Add("name", typeof(string));
table.Columns.Add("parent", typeof(string));
table.Rows.Add("Mike", "");
table.Rows.Add("Jim", "Mike");
table.Rows.Add("Alice", "Mike");
table.Rows.Add("Carol", "Jim");
for (int i = 0; i < table.Rows.Count; i++)
{
     s = s + "['"+table.Rows[i][0].ToString()+"','"+table.Rows[i][1].ToString()+"'],";
}
s = s.TrimEnd(',');

I only took a DataTable and bind it some dummy data. You need to bind it with SQL to fetch it from DB.

Now our string "s" is ready to launch as a bunch of data to Google organizational chart. Now how to add this data to javascript fucntion to call it or pass it.

The way I did it here, call a javascript fucntion which is created within code behind. Lets see how I did this.

String csname1 = "PopupScript";
Type cstype = this.GetType();
ClientScriptManager cs = Page.ClientScript;
if (!cs.IsStartupScriptRegistered(cstype, csname1))
{
     StringBuilder cstext1 = new StringBuilder();
     cstext1.Append("<script>");
     cstext1.Append("google.setOnLoadCallback(drawChart);");
     cstext1.Append("function drawChart() {");
     cstext1.Append("var data = new google.visualization.DataTable();");
     cstext1.Append("data.addColumn('string', 'Name'); data.addColumn('string', 'Manager');");
     cstext1.Append("data.addRows(["+s+"]);");
     cstext1.Append("var chart = new google.visualization.OrgChart(document.getElementById('chart_div'));");
     cstext1.Append("chart.draw(data, { allowHtml: true });");
     cstext1.Append("}");
     cstext1.Append("</script>");

      cs.RegisterStartupScript(cstype, csname1, cstext1.ToString());
 }

And one more thing don't forget to add a "chart_div" in the ASPX page. Its the thing which is holding all the tree view.

Output :


Download the whole source code here


Monday, December 22, 2014

How to upload a file in MVC 4.0 Razor

In this tutorial I will show you how to upload a files in ASP.NET MVC 4.0. So how to do this?? Lets get start. Create a new MVC 4.0 application and add a new controller, name it as HomeController. We will use Index ActionMethod to write the code to upload the file.

We need two ActionMethod named Index, one is for HttpGet and another for HttpPost. Within the HttpGet ActionMethod we don't need to write anything.

Lets create the View first. To create the View right click on the ActionMethod Index and click on the Add View  option.

In the View write down the code.


@{
    ViewBag.Title = "Upload file";
}

<h2>Upload File</h2>
<h3 style="color: green">@ViewBag.Message</h3>
@using (Html.BeginForm("Index", "Home", FormMethod.Post
            , new { enctype = "multipart/form-data" }))
{
    @Html.ValidationSummary();

    <input type="file" id="fileToUpload" name="file" />
    <span class="field-validation-error" id="spanfile"></span>

    <input type="submit" id="btnSubmit" value="Upload" />
}

Here we have taken a simple HTML file up loader and a submit button. Within the form we are calling the ActionMethod Index, which is present in HomeController. A ValidationSummary to show all validation message.

Now get back to the ActionMethod. Within the Index ActionMethod (HttpPost) write down the code.

[HttpPost]
public ActionResult Index(HttpPostedFileBase file)
{
      if (ModelState.IsValid)
      {
           if (file == null)
           {
              ModelState.AddModelError("File""Please Upload Your file");
           }
           else if (file.ContentLength > 0)
           {
              int MaxContentLength = 1024 * 1024 * 4; //Size = 4 MB
              string[] AllowedFileExtensions = new string[] { ".jpg"".gif"".png"".pdf" };
           if (!AllowedFileExtensions.Contains
(file.FileName.Substring(file.FileName.LastIndexOf('.'))))
           {
                 ModelState.AddModelError("File""Please file of type: " + string.Join(", ", AllowedFileExtensions));
           }
           else if (file.ContentLength > MaxContentLength)
           {
                 ModelState.AddModelError("File""Your file is too large, maximum allowed size is: " + MaxContentLength + " MB");
            }
            else
            {
                 var fileName = Path.GetFileName(file.FileName);
                 var path = Path.Combine(Server.MapPath("~/Upload"), fileName);
                 file.SaveAs(path);
                 ModelState.Clear();
                 ViewBag.Message = "File uploaded successfully. File path :   ~/Upload/"+fileName;
             }
         }
     }
     return View();
}

Before run this project don't forget to create a Upload folder within root directory, otherwise you will get an error.

HttpPostedFileBase file getting the file which you are uploading.

file.ContentLength : Size of the file
file.FileName : file name with extension

Now run your project and enjoying your uploading.

Download the full source code here.


Tuesday, December 16, 2014

Starting with MVC4.0 Razor

In this post I will show you how to create a MVC4.0 project with Razor as a view engine. But before that lets see what is MVC.

MVC stands for Model View Controller.

Model
  • Responsible for storing and retrieving data
  • Maintenance of states. 
  • Notification of observers of change in state.
  • Classes or references including .cs and .dll files
View 
  • Responsible for rendering UI model.
  • User interaction (Text Box, List Box, Button, Label)
  • Normally hold .cshtml, .aspx pages to show output.
Controller
  • Responsible for responding to user input.
  • Instructing model to process the user input.
  • Make a bridge between view and model.
Every controller holds one of more than one action method(s). These action methods are calling during the execution through URL.

Like lets say the URL is localhost/Home/Index
Here Home is the controller name and Index is the ActionMethod name. Now every Action method has its own View by its name. So here a view will be stored within the View -> Home folder named Index.cshtml.
Whenever you will request for Home/Index the index.cshtml file will be shown within that View ->Home folder.

Now lets see how to start this. Open your Visual Studio 2012. It has inbuilt MVC 4.0 and MVC 3.0. If you are using Visual studio 2010 then download the MVC 4.0 set up here.

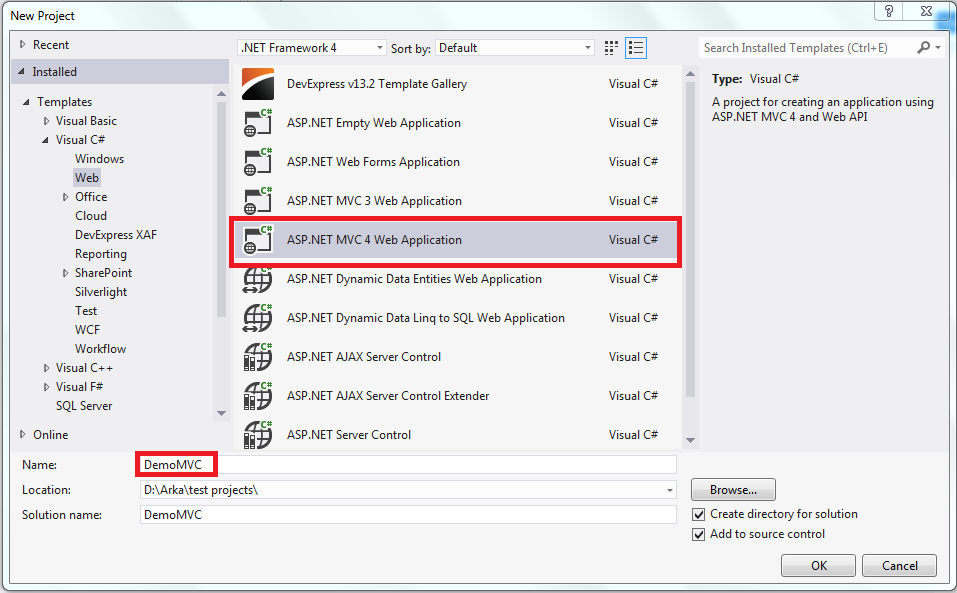
Choose  4.0 project and set your name.


The next thing you have to do to choose Razor as a View engine and don't forget to choose an Empty template.


Open your solution explorer. There will be folder named Model, Controller and View. There are two web.config in the solution. One in the root folder and another one in the View folder. The root one is the normal one to deal and the second one the file in View folder blocks the direct access of the View folder.

Normally Home is the default Controller and Index is the default action method. if you open the RouteConfig.cs file in the App_Start folder you will come to see in the method RegisterRoutes that the default controller and ActionMethod is Home and Index respectively. If you want to change it you can do easily. 

OK, so lets start with a simple program. Right click on the Controller folder and choose Create new Controller. Name it HomeController.  Open the HomeController, there will be one Index ActionMethod. Now right click on the Action Method name (Index) and you will see there are two options Add View and Go to View. As you didn't create any View previously click on the Add View option. A new window will be opened. Keep the name as it is, Set the View engine as Razor. Right now we don't have any Master page so keep the Use a layout or master page blank. Now click on the Add button and check on the View folder in the Solutions Explorer. Within a view folder there will be a folder named as your controller name Home. And within that Home controller there is index.cshtml. 

Open the index.cshtml and place any html code under <h2>Index</h2> Or you can delete it and put your code.

Hit the run button and your project will run with the all html code in your index.cshtml.

As the default ones are running we would not see any thing in the URL. It is showing some thing like http://localhost:59244/. Put http://localhost:59244/Home/Index instead of the URL right now. You will see the same result as Home controller is running and Action Method Index is calling. And you are viewing the content of index.cshtml.

Now it will be more clear if you create another Action Method in the Home Controller. So lets create another one. 


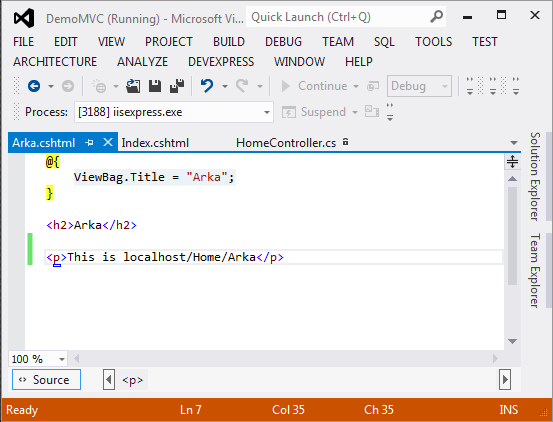
Add a View for the new controller Arka. 


Now run your project and run with localhost/Home/Arka and see whats the output. It will show the data of arka.cshtml within Home folder.

I hope the fundamental concept of the MVC architecture and how to start with this is clear to all of you. If you have any type of query just comment with your query. 

Wednesday, October 29, 2014

Show data from a database table content in MVC 4.0 razor

In this MVC tutorial post I will show you how to show a database content to a page in MVC 4.0. So for those who are not aware of MVC (Model View Controller) concept you can visit this post  as a reference.

So first create a new MVC project. Select Razor as your View engine.
Create a new database named what ever you want and add a new table named tblEmployee.Design your database as following.


And after that add an EmployeeController in the Controller folder.

And after that add an Empployee.cs in the Model folder. Add the following code into the Employee.cs.

using System.ComponentModel.DataAnnotations;
using System.ComponentModel.DataAnnotations.Schema;

namespace MvcApplication1.Models
{
    [Table("tblEmployee")]
    public class Employee
    {
        [Key]
        public int empid { get; set; }
        public string name { get; set; }
        public string dept { get; set; }
    }

}

I set the Table attribute to tblEmployee as to connect the tblEmployee table with Employee class. Normally it takes the class name as the class name. But here our class name is differ from class name. So I did it.
Now add another class named EmployeeContext.cs into the Model folder again. Its is to connect the connection string in Web.Config file.
Write down the following code in the EmployeeContext.cs
using System.Data.Entity;

public class EmployeeContext : DbContext
{
    public DbSet employee { get; set; }
}

Add the connection string in the web.config as a name EmployeeContext. Now come back to EmpployeeController. Add a View of Indes Action. Doing this choose create a strongly typed view and select Employee. If Employee is not showing then do not get panic. Just build the solution once. It will show the Employee in to the drop down list to choose. Now in the Index.cshtml in View add the following code.
@using MvcApplication1.Models;
@using System.Web.Mvc;

@model IEnumerable

@{
    ViewBag.Title = "Index";
}

All Employee Details

@foreach(Employee emp in @Model) { }
@emp.dept @emp.name @emp.dept

In the EmployeeController write down the code.

using System;
using System.Collections.Generic;
using System.Linq;
using System.Web;
using System.Web.Mvc;
using MvcApplication1.Models;

namespace MvcApplication1.Controllers
{
    public class EmployeeController : Controller
    {
        public ActionResult Index()
        {
            EmployeeContext emp = new EmployeeContext();
            List employee1 = emp.employee.ToList();

            return View(employee1); // return list of employee
        }
    }
}

Now run your project and enter the URL localhost://Employee/Index

Download the full source code here.

Popular Posts

Pageviews