Monday, August 25, 2014

Delegates in C#

We have used pointers in C, delegates are something like pointers in C but type safe. Previously we send data as parameter but today we send methods as parameter through objects. In C# 2.0 delegates are introduced. It used to send methods to pass through its object. Its like a reference variable to the reference of the method which you have to execute.It is derived  from System.Delegate class and generally use for implementing events and call back method. In the next few lines I will show you how to declare a delegate and how to execute through the object of the delegate.

First we lets see how to declare the delegate in C#.

public delegate int delegate1 (string input);
public delegate void delegate2 (string input);
public delegate string delegate3 (string input);

In these above code two delegates are declared. First one for a method which takes an input string and return a integer value. Second one is taking an input string as first one but returning nothing(void). And third and the last one denotes a method which takes string also return string. So is clear how to declare different delegate. Now lets check how to call the delegates. To call using these delegates we need to create objects of these three delegates. Lets create three objects of these three.

public delegate int delegate1 (string input);
public delegate void delegate2 (string input);
public delegate string delegate3 (string input);

delegate1 obj1 = new delegate1(methodReturnInt);
delegate2 obj2 = new delegate2(methodReturnVoid);
delegate3 obj3 = new delegate3(methodReturnString);

So objects are created of these different delegates.methodReturnInt, methodReturnVoid, methodReturnString  these are the method name which are called by the three delegate objects. Suppose the three methods are like...
 
// return int 
public static int methodReturnInt(sting ip)
{
   return 0;
}

// return void
public static void methodReturnVoid(sting ip)
{
   return ;
}

// return string
public static string methodReturnString(sting ip)
{
   return "Hi !";
}

Now how to call through the objects. Lets see.
static void Main(string[] args)
{
  // creating objects
  delegate1 obj1 = new delegate1(methodReturnInt);
  delegate2 obj2 = new delegate2(methodReturnVoid);
  delegate3 obj3 = new delegate3(methodReturnString);

  // calling methods with value
  obj1("abc");
  obj1("pqr");
  obj1("xyz");
}

I thing now its clear to you how to use delegates in your project after these short session of coding. Try it yourself and bang it. Happy coding.... :)

Saturday, August 23, 2014

How to deploy a site in local IIS with database

Here I will show you how to deploy your site in your local IIS with your database, so that your site can be access from any other computers connected in your LAN.

The very first thing you have to know what IIS is? Full form of IIS is Internet Information Services. According to Wikipedia IIS is
Internet Information Services (IIS, formerly Internet Information Server) is an extensible web server created by Microsoft for use with Windows NT family.[2] IIS supports HTTP, HTTPS, FTP, FTPS, SMTP and NNTP. It has been an integral part of the Windows NT family since Windows NT 4.0, though it may be absent from some editions (e.g. Windows XP Home edition). IIS is not turned on by default when Windows is installed. The IIS Manager is accessed through the Microsoft Management Console or Administrative Tools in the Control Panel.
First of all create your own application with database and then prepare your published project.

To upload your application you need to enable IIS in your local machine. To do that visit my article on Configure your IIS in local machine. It will take 1-2 minutes to configure your IIS. After this go to Run and type inetmgr to open the local IIS. You can verify your IIS is working or not. Go to your browser and type
localhost. It will open your IIS in browser.

Now its time to add your application into IIS. Open your IIS and click on the Default under Site.


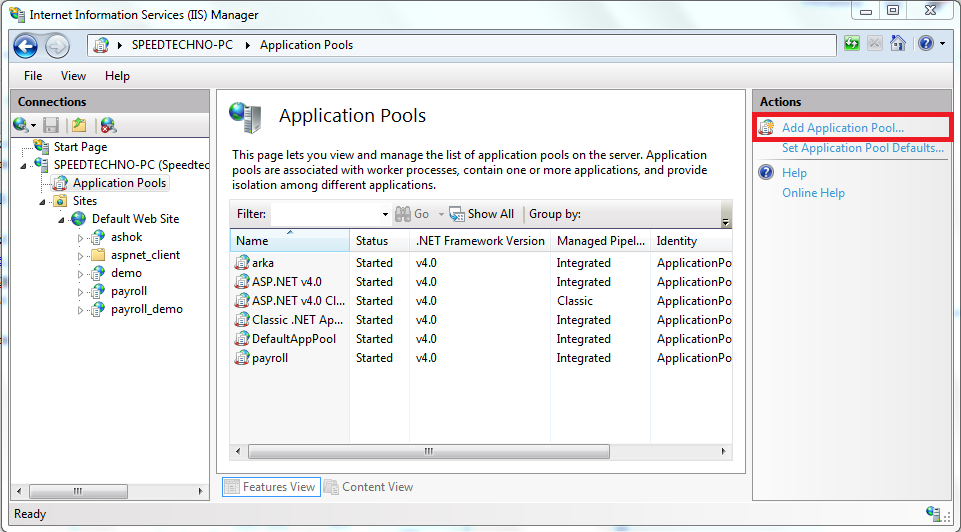
Now on the Default you can see there are some sites are uploaded previously in the above image. Now click on the Application Pool and you can see there are previously created application pool. To create your own application pool click on the Add Application pool.


Here input the name and .NET framework and save it. Now back to Site in your IIS. Select the Default and right click on the Default. Select Add Application.


After clicking on the link a window will be opened and there you have to give the alias name. It will be your site name. Suppose you are imputing "arka", so your site will be opened as localhost/arka.  In the physical path select the folder where your published files are situated. Now a main thing, choosing the Application Pool in the DropDownList. Select your application pool that you have created. Now your site is ready to launch after clicking in the OK button. 


Give your files and folders with full permission to access those from any other computer. To do that, select the root folder and go to properties. Within properties choose Security tab. Click on the Edit button and then Add button. From there go to Advance option and click on the Find Now to find your IIS User.  


 Add your IIS_USERS to add users.

 Now another one important thing you have to do. Connect your .NET with IIS. To do that open your command and run these code according to your OS bit, either 32 or 64 bit.

For 64 bit 
%windir%\Microsoft.NET\Framework64\v4.0.30319\aspnet_regiis.exe -i

For 32 bit
%windir%\Microsoft.NET\Framework\v4.0.21006\aspnet_regiis.exe -i

It will install the ASP.NET with IIS connection. Now your application is ready to launch without database. 
It time to connect the database with your IIS.

Open your SQL Management Studio and select your database. Under Security section click on the User, and Add New user.


On the Login name click on the button beside and a new window will be opened with Login object. Click on the Browser and choose the application pool that you have created.


Now after adding click on the OK to add the user. Now go to Server Security section and Add New Login 

Now in the opened window go to User map section and choose your database.


Now click on the button on the left side another new window will be opened with Schema object. There write dbo and click on the Check name. Click on the OK button to proceed. Now back to User Mapping and check db_datawiter and db_datareader. Now again go to the security part of your database. 

Go to Securables  and  choose all the check boxes in Grant and click on the OK button.

Now your application is fully configured to launch. Browse your site and ask your friends to browse your site from other computers in your LAN.

Sunday, August 17, 2014

Checkbox in Gridview header to select all rows using JavaScript in ASP.NET

In many sites you may watch in a table there are check boxes to select or deselects. And above all these check boxes there is one check box which controls all other text boxes to select and deselect. To day in this example I will show you how to design a check box into a  GridView to design and work like the above statement in ASP.NET.

So, first of all create a new project and add a new WebForm to start. In the C# code add the connection first as per your database and bind your GridView with the DataTable or DataSet. To add a column of check boxes make sure the AutoGenerateColumns property is false. Manually add your database columns and at the last add your check box.

Coding in GridView will be some thing like these.


After binding your GridView check it once if it is running successfully or not. If its running successfully come to the JavaScript coding to select or deselect the check boxes using master check box. As here we are taking master check box only in Header, you can take this also in Footer or in both place. Now its time to code in JavaScript. On the Head section of your ASPX page add Script tag and close it. With in that Script tag write down the following js code.


Now run the project and check if your check boxes are working fine or not. I am sure it will run successfully. In the next article I will show you how to take those selected rows on a button click.

You can download the full source code here.
Download Now

Monday, August 11, 2014

Hide URL on mouse hover of a Hyper Link in HTML

Generally on a mouse hover on a Hyper Link of HTML the URL is showing in the left down corner of the browser. So if you want to hide this waht yoou have to do?
To hide the URL create a new HTML page and add to anchor tags.

Page hide URl
Page show URl

Here in this example it will show the URL but if you do this following example the URL will be hidden.


  page don't show URL
Page show URl

In the first Hyper Link, on mouse hover your URL will not be shown. But in the second one will remain as it is. In the first Hyper Link , we use onclick event to call a JavaScript inbuilt fucntion to redirect the page.
    window.location.href = 'page.aspx';
So try it yours and enjoy. 

Saturday, August 9, 2014

TextBox characters limitation using Regular Expression and JavaScript JQuery

Some times its important to restrict the characters limit of any text box in your ASP.NET site to prevent some of your action or any thing others. But how to do that. Generally we can do this in 3 ways.
  • Check in code behind
  • Use regular expression
  •  JavaScript or jQuery
Before checking all these methods first create a new project and add 3 pages for 3 methods.

Check in code behind :

In the first web form add a new TextBox and a new Button. Make the TextBox multiline and generate a Click event of the button. In the Click event write down the following code.

protected void btnSubmit_Click(object sender, EventArgs e)
{
 if (txtMessage.Text.Length > 20)
 {
  lblMessage.Text = "Out of 20 characters !";
  lblMessage.ForeColor = System.Drawing.Color.Red;
 }
 else
 {
  /* Do your actoin */
 }
}


Using Regular Expression :

Using the regular expression you can do this also. Just use the "^[\s\S]{0,20}$" expression to validate the TextBox. Follow the following code.

Using Regular Expression


And now the last and efficient one to check the maximum characters.

Using JavaScript or JQuery:

Using JavaScript and JQuery you will get the best result to check the maximum characters of a TextBox with the help of MaxLength.min.js. And one extra thing you have to do. have to add the jqery.min.js API of JQuery, which we will get from either JQuery or Google API center.
Use the following code to check the maximum characters.

ASPX Code :

Max charecter in a Text Box

Using Javascript


JavaScript Code :


aRun your project and enjoy.... :)
Download the fill source code here.

Create instant search of Grid View in ASP.NET using C#

To day I will show you how to create a search in GridView  in ASP.NET using C#. You can do it normally getting a ASP command button and run a query to get the value in a GridView. It will refresh the page every time. You can stop this by adding an UpdatePanel but the time taking will be more or less same. But here I will use quickseacrch.js to search within a GridView.

To do this create a new project and add a new web form in your Visual Studio. In the aspx file write the following code to proceed.
and in the head section add a script tag to do this js function.

Now in the CS page paste the following code.
protected void Page_Load(object sender, EventArgs e)
    {
        if (!this.IsPostBack)
        {
            DataTable dt = new DataTable();
            dt.Columns.AddRange(new DataColumn[1] {new DataColumn("Name", typeof(string))});
            dt.Rows.Add("Arkadeep De");
            dt.Rows.Add("Shashank Shekhar");
            dt.Rows.Add("Pradeep Kumar Das");
            dt.Rows.Add("Sucheta bhaumik");
            dt.Rows.Add("Eliza Nayak");
            GridView1.DataSource = dt;
            GridView1.DataBind();
        }
    }

    protected void OnDataBound(object sender, EventArgs e)
    {
        GridViewRow row = new GridViewRow(0, 0, DataControlRowType.Header, DataControlRowState.Normal);
        for (int i = 0; i < GridView1.Columns.Count; i++)
        {
            TableHeaderCell cell = new TableHeaderCell();
            TextBox txtSearch = new TextBox();
            txtSearch.Attributes["placeholder"] = GridView1.Columns[i].HeaderText;
            txtSearch.CssClass = "search_textbox";
            cell.Controls.Add(txtSearch);
            row.Controls.Add(cell);
        }
        GridView1.HeaderRow.Parent.Controls.AddAt(1, row);
    }

Now run your project and test it. Download the full source code here.

Friday, August 8, 2014

Encoding URL in ASP.NET using C#


Some time in the URL we get some spacial characters like plus(+) is not getting in code behind. As example in an encrypted URL like
http://localhost:1033/page.aspx?Value=1+E4Hccj9hE=
Here the value of l is "1+E4Hccj9hE=" but when you will get the value by Request.QueryString() it will get the value "1 E4Hccj9hE=". So it will occur an error in your project. 

So how to prevent this?

There is a method called Server.UrlEncode. Using this method we have to pass the url to execute. Then all the spacial
characters will be encoded into their own code. Like for space it will be %20 in the URL.

The C# code is..
protected void Page_Load(object sender, EventArgs e)
{
    Response.Redirect("~/page.aspx?Value=" + Server.UrlEncode("+12+e"));
}

Try this and save your day or some one others.

Tuesday, August 5, 2014

Open a page in a new tab on button click from code behind

To open a new page in a new tab from a hyperlink is an easy thing but from a code behind is not a easy one to do. In this example I will show you how to redirect to a new page from code behind in C#.

First create a new project and add two new pages. page1.aspx and page2.aspx

Now in page1.aspx add two new buttons. In the code behind of two buttons add bellow codes.

Method 1 :
This is to open a page in pop up.


<body>
    <form id="form1" runat="server">
    <div>
        <asp:Button ID="Button1" runat="server" Text="Open in Popup" OnClick="Button1_Click" />
    </div>
    </form>
</body>

Now in the code behind

/// <summary>
/// in pop up/// </summary>
/// <param name="sender"></param>       
/// <param name="e"></param>
protected void Button1_Click(object sender, EventArgs e)
{
     Page.ClientScript.RegisterStartupScript(
          this.GetType(), "OpenWindow", "window.open('2.aspx','_newtab');", true);
}

Method 2 :
This is to redirect a page in a another tab.


<body>
    <form id="form1" runat="server">
    <div>
        <asp:Button ID="Button2" runat="server" Text="Open in Other Tab"
            onclick="Button2_Click" OnClientClick="document.forms[0].target ='_blank';" />
    </div>
    </form>
</body>

And the code is simpler even.

/// <summary>
/// in other tab
/// </summary>
/// <param name="sender"></param>
/// <param name="e"></param>
protected void Button2_Click(object sender, EventArgs e)
{
     Response.Redirect("2.aspx");
}

Download the full source code here. Try it yours...Enjoy.... :)

Friday, August 1, 2014

Create an ASPX page dynamically in ASP.NET C#

Hi, here in this example I will show you how to create a new ASPX page dynamically or virtually in ASP.NET using C#.

First create a new website and add a new page. In this page we will create a new page. Then take one TextBox and two Buttons, one for generating  and another one for redirecting to out new virtual page.

Now on the button click event write down the following code.


/// <summary>
/// Generate new page
/// </summary>
/// <param name="sender"></param>
/// <param name="e"></param>
protected void Button2_Click(object sender, EventArgs e)
{
     string[] aspxLines = {"<%@ Page Language=\"C#\" AutoEventWireup=\"true\" CodeFile=\""+TextBox1.Text.Trim()+".aspx.cs\" Inherits=\"generate_page_runtime."+TextBox1.Text.Trim()+"\" %>",
                        "<!DOCTYPE html>",
                        "<head>",
                        "<title>The New Page</title>",
                        "</head>",
                        "<body>",
                        "   <form id=\"form1\" runat=\"server\">",
                        "       <div>",
                        "           <asp:literal id=\"output\" runat=\"server\"/>",
                        "       </div>",
                        "   </form>",
                        "</body>",
                        "</html>"};
       string[] csLines = {"using System;",
                         "using System.Web.UI.WebControls;",
                         "namespace generate_page_runtime {",
                         "    public partial class "+TextBox1.Text.Trim()+" : System.Web.UI.Page {",
                         "        protected void Page_Load(object sender, EventArgs e) {",
                         "            output.Text = \"Our new page\";",
                         "        }",
                         "    }",
                         "}"};
       File.WriteAllLines(Server.MapPath("" + TextBox1.Text.Trim() + ".aspx"), aspxLines);
       File.WriteAllLines(Server.MapPath("" + TextBox1.Text.Trim() + ".aspx.cs"), csLines);
}


/// <summary>
/// Redirect to new virtual page
/// </summary>
/// <param name="sender"></param>
/// <param name="e"></param>
protected void Button1_Click(object sender, EventArgs e)
{
     Response.Redirect("" + TextBox1.Text.Trim() + ".aspx");
}

And on the ASPX page write down the code.

<head runat="server">
    <title>Generate New Page</title>
</head>
<body>
    <form id="form1" runat="server">
        <div>
            <h1>Geberate New Virtual Page</h1>
            Old page
        <br />
            <asp:TextBox ID="TextBox1" runat="server"></asp:TextBox>
            <asp:Button ID="Button2" runat="server" OnClick="Button2_Click" Text="Button" />
            <br />
            <br />
            <asp:Button ID="Button1" runat="server" Text="Button" OnClick="Button1_Click" />
        </div>
    </form>
</body>

Run your project and generate your virtual pages. You can download the full source code here.

Popular Posts

Pageviews